HubSpot - Integration / Setup
In this article, you'll learn to translate your HubSport website and make it website multilingual within minutes.
1) Create an account on Weglot
This account will be where you manage and edit all your translations. You can create your Weglot account here.

You should receive a validation email in the account with which you signed up.
Then select “other” as your website technology.

2) Add your new languages and select your URL structure
The next step is to add the original language of your website and the languages you’d like to translate it into.

After that, you need to enter the URL of your website, and your URL structure:

You can choose the type or URL you wish to use for the integration. Both options are good for your SEO. The only difference is the URL structure. For example, for the French version of your website, the URLs would look like:
- Subdomains: fr.yourwebsite.com
- Subdirectories: yourwebsite.com/fr
Please note that if you’re using a temporary HubSpot domain name ( for example hs-sites.com) you should use the “Javascript integration” instead. Once you have a permanent domain you can continue with this integration, which will give you language subdomains.
3) Add the Javascript integration
When added, select “Connect my live website.”
You’ll then see a blue section titled “Looking for the easiest setup?” — this is the JavaScript integration option.

Click "Next".
Copy and paste the code shown on your screen
The following screen will be displayed:
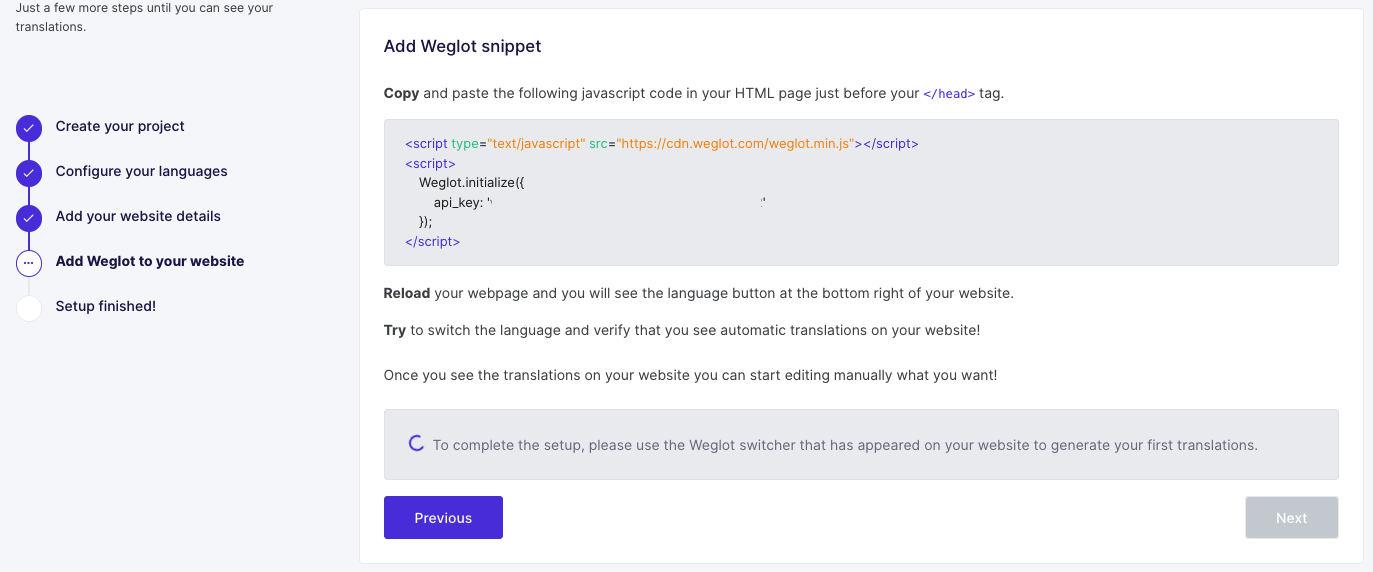
Copy the code that will appear on your screen below
Then, click on the “Next” button.
4) Add the Javascript code
This will allow you to add a language-switcher button to your HubSpot website.
- Go on your HubSpot website, click on “Settings” > “Advanced option”
- Go to “Additional code snippet”, and you should see a field that’s titled “Head HTML”

Copy and paste the JavaScript snippet provided to you on your Weglot account.
Click on the button, “Save Changes” and publish your changes by clicking on the blue button at the very top right.
(If you are implementing the Javascript integration the setup if finished and your website is now multilingual)
5) Create your subdomains (important for multilingual SEO)

You will then have to add the Javascript snippet provided at the end of the setup.
To add it into Hubspot please see: Add the Javascript code
6) Create your subdirectories
Please note that the subdirectory integration on a Hubspot integration requires specific attention.
You can contact support@weglot.com if you need help with the setup.
Steps to follow
- Start the subdirectory integration in the Dashboard > Setup page
- Add the query
?manualorigin=trueat the end of the page URL -
- You should be able to see the following part on the setup page


- See next step for the "Origin Address" to add
How to find the Origin Address
The CNAME for the origin will be in the format <HubID>.<suffix>
The suffix is determined by the data center assigned to the user's HubSpot account and the last two digits of the HubID.
Determine your data-center
HubSpot account > settings icon > Account Defaults > Data Hosting tab > Your data hosting location section

With this information, we will be able to find part of the suffix from the table below (available in the HubSpot documentation).
Suffixes by data center
| Data center | Suffix |
|---|---|
| US East | sites-proxy.hscoscdn[##].net |
| US West | sites-proxy.hscoscdn-na2.net |
| Canada | sites-proxy.hscoscdn-na3.net |
| European Union | sites-proxy.hscoscdn-eu1.net |
| Australia | sites-proxy.hscoscdn-ap1.net |
For example, for a user whose account is hosted in US East, the suffix will be in the format sites-proxy.hscoscdn[##].net (where [##] are the last 2 digits determined by the HubID - US East hosted accounts are the only ones which need these 2 digits).
Find the suffix 2 last digits from HubID
We will now take the HubID last digits and we will check the matching in the following tab
| HubIDs ending with | Suffix number |
|---|---|
| 00-10 | 00 |
| 11-19 | 10 |
| 20-29 | 20 |
| 30-39 | 30 |
| 40-49 | 40 |
| 50-59 | 00 |
| 60-69 | 10 |
| 70-79 | 20 |
| 80-89 | 30 |
| 90-99 | 40 |
If the HubID is 123456 and is hosted in a data center in US East, the CNAME of the origin would be 123456.sites-proxy.hscoscdn00.net .We will therefore enter this CNAME as the origin in the "Origin address" field when setting up the subdirectories.
After clicking on "Next", we will ask you to add a new DNS record to your DNS manager.
Once you've made this, please click on "Check DNS".
After this, you may be asked to modify an existing DNS record. Please don't do so and contact us at support@weglot.com so that we can finish the subdirectory setup for you.
7) Your HubSpot website is now multilingual!
Once it’s done, you’ll be able to see the language switcher button at the bottom of your website. Feel free to test it and switch between languages. Weglot automatically generates a first layer of automatic translation, you’ll then be able to edit and manage your translation from your Weglot dashboard.