How to use Weglot with Shopify Markets?
In this article, you’ll learn what Shopify Markets is and how to use it with Weglot.
What is Shopify Markets?
Shopify Markets enables you to create and manage international markets directly from your Shopify store, making it easier to:
- Sell products across multiple countries
- Control all your storefronts from a single Shopify account.
You can learn more about Shopify Markets in this Shopify guide.
Is Weglot compatible with Shopify Markets?
Yes, Weglot is fully compatible with Shopify Markets.
- Weglot uses a subdirectory-based integration, meaning your translated pages are displayed under subdirectories such as
https://website.com/en/. - Shopify Markets, on the other hand, structures URLs by combining both the language (from Weglot) and the market (from Shopify) as separate identifiers, joined by a dash.
The URL format looks like this: https://website.com/[Weglot-language]-[Shopify-Market] .
Example URL structure:
https://website.com/fr-ca→ French-translated page for the Canadian markethttps://website.com/en-ca→ English-translated page for the Canadian market
How can I integrate Weglot with Shopify Markets?
If you haven’t set up any Shopify Markets yet, we recommend checking out this Shopify article to guide you through the process. It will help you understand how to create and manage your Markets.
Setup in Shopify:
Requirements
- You must use a custom domain, not a Shopify subdomain that ends with
.myshopify.com. - You need access to your DNS provider to add or edit DNS records. This is usually where your domain is managed, for example Shopify, Cloudflare, or GoDaddy.
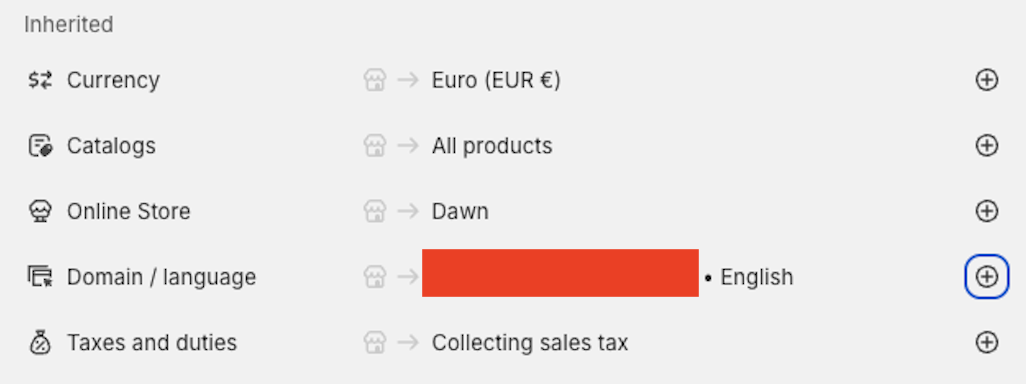
1) Configure subfolder URLs in Shopify Markets
In your Shopify dashboard, go to Markets in the panel on the left.
- If you want to create a new market, click on Create market at the top right. If you want to access an existing market, just click on it
-
Then, in this section, click on the "+" on the right of your domain:
3. Choose New subfolder on *your_domain:
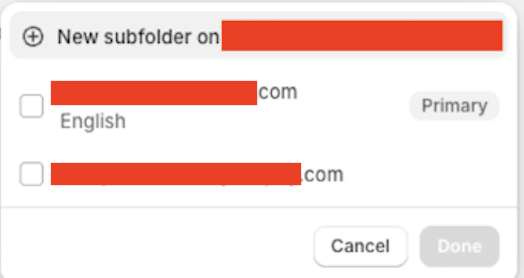
4. Indicate the domain suffix you want and click on Done:


2) Disable Shopify native languages
Weglot handles translations. Shopify’s native languages use the Shopify Translation API, which can conflict with Weglot’s rendering and routing.
- In your Shopify dashboard, go to Settings > Languages.
- Unpublish any additional languages, then delete them.
Setup in Weglot
3) Activate subdirectories in your Weglot project
- In your Weglot dashboard, go to Settings > Setup and toggle Subdomains/Subdirectories.
If you previously used the subdomain integration, this action will deactivate it.
- Click the same toggle again to start the subdirectory setup.

- In Domain URL, enter your primary domain URL.
- In Publish Destination, click Connect my live website and in URL Type, select Subdirectories.
- Click Next to reach Your DNS settings.

Setup in your hosting provider
- First, you will have to add the following DNS record in your DNS provider:
host (or name) > cloudflare-verify
type > TXT
value > will be given to you during the subdirectory setup process on Weglot
- After adding the new DNS record to your DNS provider, go back to your Weglot account and click on "Check DNS".
- Wait a few minutes for the SSL certificate to be validated. To check if this has been done, click on "Check DNS".
- A new DNS entry will appear on your screen. Modify the existing DNS record in your registrar with the value Weglot gave.
If you wish to remove the subdirectories integration, set this DNS record back to its previous value before deactivating the integration. We recommend taking a screenshot of your current settings before modifying them. In any case, Weglot will warn you about this should you attempt to deactivate the integration.
If you don't have a subdomain in your URL (e.g., mysite.com):
The second DNS record will ask you to modify your A record.

The second DNS record will ask you to modify a CNAME record.
- Once you have modified the second DNS, save the changes and click on "Check DNS".
Confirmation

Once Weglot is working well on your Shopify Markets store, you can look at this article we made to optimize your use of Weglot on this store (translate dynamic content, checkout, and mail notifications).
If you encounter any issues during the process, do not hesitate to contact us at support@weglot.com.